Monday, August 3, 2015

3D Strawberries


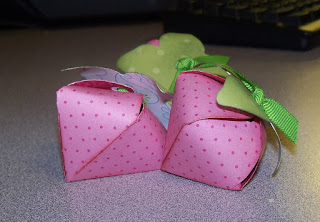
Look at these adorable strawberries!!

These were very easy to make.  The step by step directions can be found at Whoopsie Daisy.

You can make these large or small.  They will hold all kinds of goodies depending on the size.

I cut these at 5 inches and they hold 2 jolly ranchers or you can turn them upside down and they will hold a tootsie pop.

Whoopsie Daisy provides a template you can use or you can go to The Frugal Crafter and she provides directions for the sucker holder.  She also provides an SVG file for those with Sure Cuts A Lot (that is what I used!)

These were quick and easy.   I spent about 20 minutes on these 3 strawberries (not including cutting time!).

If you have the Cricut cartridge, Flower Shoppe.  You could make this with the flowers on the cartridge.  Just use one with 5 connecting petals.

Enjoy!
 Follow Me on Pinterest

Tuesday, March 12, 2013

Apple Upside Down Cake

My sister bought a new cake book and decided to make every cake in the book (Crazy!).  She later decided to revise that goal and asked around to see who would join her. 

I'm not a great baker but it sounded fun to me so I reserved a copy of Rose's Heavenly Cakes by Rose Levy Beranbaum from the library.  Amazingly, two days later I receive a wonderful package from my sister....my very own copy of the book!

This Apple Upside Down Cake is the first recipe in the book and seemed like a good place to start.  I made minimal changes to the recipe, used all-purpose flour instead of cake flour, omitted the walnuts and added a nice scoop of ice cream!

This cake was easy to make.  The directions were clear and easy to understand. The cake portion is dense and moist, kind of like pound cake.  The apple topping was easy to make and you could very well use any kind of fruit for this.  We have some pears and quince that I canned from our trees last summer and  I'll probably give them a try next.

My son's 19th birthday is Saturday and he is looking through the book to pick out his birthday cake.

Thursday, May 17, 2012

Meringue Ice Cream Cones

 "Ice Cream Cones"

Although you wouldn't know it from the amount of posts I've done lately, I've been very busy.

Here are some "ice cream cones" I made for my kids' friends.

Super easy, the hardest part was waiting for the chocolate to dry!!

I got the meringues at Trader Joes but if you're very talented you could make your own. 

Dip the cone in melted chocolate to completely cover the rim, this will act as the glue.  Place 1 meringue upside down, pipe some melted chocolate on top of that and place another meringue on top. 

I had a cardboard box that I had poked holes in so I could let them dry.  Then it was just a matter of wrapping them up and handing them out and listening to all the "wow's!" and "Thank you's!!"


Monday, December 19, 2011

Paper Snow Flakes


Here's a great place to get the patterns for paper snowflakes. I'm envisioning 100's of flakes hanging from my ceiling since it rarely snows for Christmas here!!

PAPER SNOW FLAKES