Wednesday, December 23, 2009

Christmas Cards

These are some of the Christmas cards I made this year. I had a great time with my Cricut trying to come up with a card I really liked.

I finally just gave out all of the cards I made. Next year I'll just make one....I have a plan!!


Monday, November 9, 2009

Cricut Card


Sometimes I get very frustrated with my Cricut...other times I love it!! This is one of the "love it" times!

Sunday, October 25, 2009

Halloween Pumpkins

I used my cricut to cut my stencil for this years halloween pumpkin. This is the coffee cup that is on the "lyrical letters" cartridge (I believe that's correct!).

I set my cricut to cut this at about 4.5 inches as it was a pretty small pumpkin.

I loved the way it turned out though!

Monday, October 19, 2009

Party Crackers


This is a fun project that can be modified to fit any occasion. They make wonderful goodies for special trick or treaters!

For this project you will need the following:

1 empty toilet paper roll
1 6 1/2 X 12 sheet of designer paper
2 1/2 X 8 inch strips of coordinating paper
tag punch
ribbon, cord, scissors, adhesive


Cut the toilet paper roll across the middle almost in half. Leave about 1/2 to 1 inch connected. Fill the tube with candy, confetti, novelties, money, whatever!! (Don't forget to fill before wrapping!)
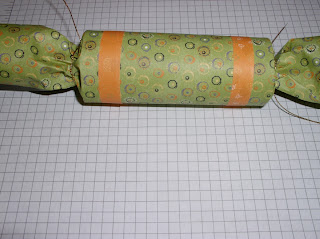
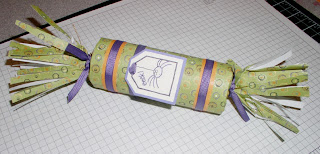


Wrap the 6 1/2 X 12 sheet of paper around the tube, so the paper sticks off the tube for the ends. In other words, the length of the tube and the length of the paper go the same direction.


Squish the ends closed and tie with the cord. You can skip the cord and just tie with ribbon but I find it easier to tie it with the cord first.


Wrap the thinner pieces of paper around the ends for accent.


Make a tag and embellish however you want and you are done!

Easy-Cheesy!

Sunday, August 9, 2009

toes, toes, toes


My sister came from the east coast for a visit so of course she, my daughter, and I had to go have pedicures!!! These are the pictures I took. I can't wait to scrap them. I'm going to start with an 8X10 digital page and then put that on to a 12X12. I'll post the results!!

Wednesday, July 29, 2009

Birthday Card

I made this card for one of my friends. I used Stampin Up stamps, paper, and brads.

I cut the tag by hand and cut the base with my cricut.

I love all the white showing....makes it look clean!

Friday, July 24, 2009

Page Maps

If you're like me you sometimes get stuck for a really great idea for a scrapbook layout.

Here's a website by Becky Fleck I found that has hundreds of layout "maps". Unlike a real map, you don't have to follow it exactly to get where you want to go.

I printed out a bunch of the maps and plan on taking them to my church's scrapbook overnighter tonight.

Just click on the link below to access all the wonderful layouts she has in her archive.

Page Maps

Friday, July 17, 2009

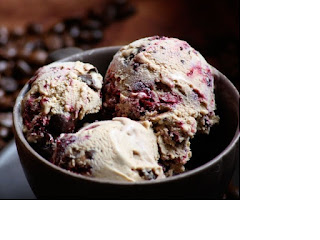
Northwest Caffeine Buzz Ice Cream


Doesn't this ice cream look delicious?? It's a brand new flavor invented by my sister.

It's entered in a contest so if you think it looks as amazing as I do click on the link below to vote for it!!

Ice Cream Finalists

Storage Ideas

This is a link to a site I found today while I was just browsing the internet. There are some great ideas here for craft storage.

I especially liked to use of old drawers for storage or bookshelves.

Check it out for yourself!!

Storage Ideas

Tuesday, July 7, 2009

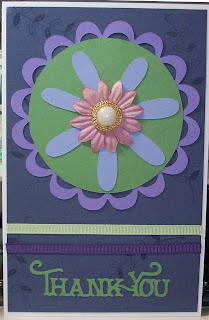
Here are a couple of cards I've recently done. The flower card was done by stamping the images and then sponging on the color, cutting out the image and then smashing and folding and opening and doing it all over again! Then I lightly sponge more color on and mounted them with Stampin Dimensionals.
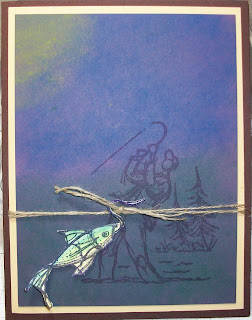
The fishing card was done using a variation on the technique Pullin' Pastels by Gina K. The fish was stamped seperately and cut out. Although it looks like it's tied on with the hemp cord it's actually glued on.

Sunday, July 5, 2009

Tag Card


Here is something I made a couple of years ago. I made each tag individually and then "hooked" them together with a punch from my word window punch. I think next time I would use one sheet of paper but I originally was going to do something else so this is what I ended up with. I do like the way it turned out though.

Tuesday, June 30, 2009

American Capitalism and Pravda

Here's an interesting article from Pravda Online. It's well worth the read and eye-opening to see what Russians think of the new America.


American Capitalism Gone With a Whimper

Friday, June 12, 2009

6th Grade Promotion

Last night my daughter transitioned from 6th to 7th grade. In our district that means she goes from elementary to middle school.

Our school makes a big deal about it and our teachers this year were awesome!!

A big fancy evening dessert with lots of awards, graduation music and a concert put on by the 6th graders were just a few of the highlights.

We had a balloon arch that stayed up until it was time to start and then decided to fall!!

The back ground paper came from Shabby Princess and the blingy daisy came from Ellie Lash

Monday, June 8, 2009

Digital Halloween

I'm really not this far behind on my scrapbooking (well, maybe I am on the kids scrapbooks!!). Anyway, this was done completely on the computer with Paint.Net. I really love that program!!
Everything I used was free on the web. If you look real close (click on the image for a larger version) at the flowers on the bottom you can see that the centers are eyelets!! I got them at freedigitalscrapbooking.com

I wish I could remember where I got the background paper because I love it.

The title is done on two separate layers so I could get the shadow effect.

This page is going in my son's scrapbook which is why it focus' on him and not "princess leia"!

Thursday, June 4, 2009

Teacher Thanks

Weeellll, I've been a busy little beaver lately!!! School is almost out for the summer. I can't wait. I love being home with my kids!!

We have two 6th grade teachers at our elementary school so I've made them both a card and will have all the kids sign them.

These are a full 8.5X11 sheet of paper folded in half so there will be plenty of room to write inside.

I used my cricut to cut the shapes. I used Walk in My Garden, Storybook and Calligraphy Collection to do these. I also used the Dream a Little stamp set from Stampin Up! to stamp the back ground images.

The small pink flower and the dark blue flower are from Got Flowers? and the pearl center is an old button. The blue polka dot center is a brad.

Wednesday, June 3, 2009

Tile Coasters

I saw these tiles at Home Depot and just had to have them!! They measure 3.5 X 3.5 inches.
I love the rough edges they have.

They make great additions to a wall. These I made into coasters although, because they have been sprayed with a sealer they don't really soak up liquid from a glass.

I stamped the images with Staz-On ink and the chalked them.

After I was done I sprayed them with an acrylic sealer and put felt on the back.

I love the way they turned out.

Saturday, May 30, 2009

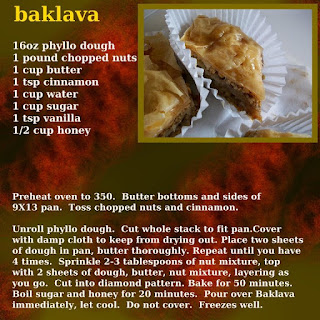
Baklava

Here's another page for my digitally scrapped recipe book!!!

My husband really loves baklava and it's pretty easy to make so the last time I made I took pictures so I could add it to my book.

I did everything in Paint.net. I even made the background my self!!! I was really impressed and can't remember how I did it.

All I know is I started with a fractal image and then started changing it and adding different effects until it looked like this.

You can try this too since paint.net is free. Try the recipe also...it's fantastic!!

Friday, May 29, 2009

Lyrical Letters

I can't wait until the mail gets here today!!! I have loved this Lyrical Letters cartridge for my Cricut since everyone started pre-selling it!!.

I balked at the price though. The lowest I found it for was 50.00 at Oh My Crafts and although that's where I normally buy my cartridges I couldn't afford that price.

So I went to Ebay. I knew I had 36.00 in my Paypal account so that would be my limit. Then, I just started bidding on cartridges one at a time. As soon as I lost a bid I'd move on to the next one and guess what??? It only took me 21 tries!! I finally won an auction and got my cartridge for 34.15 with free shipping.

It should be here today....just in time for the weekend!

Saturday, May 9, 2009

Happy Mother's Day!!


Here are the Mother's Day cards I made this year (I always have to make three of them!!) Sometimes I cheat and just make them all the same but this year I got my sponge out and just went crazy!!

The two main sets I used are: Petal Prints, Serene Spring

Saturday, April 25, 2009

May 09 Virtual Stamp Night

Splitcoaststampers had another virtual stamp night again. This was just a mini one, so not so long and not as many challenges. I did four of them. I really love those challenges because it gets my creative juices flowing and makes me realize that I can come up with my own ideas!!


A Yummy Mistake

I was going to make some mini-brownies. The kind with a mini peanut butter cup in each one (they are soooooo good!).

There must be something wrong with my pan though because everyone of them stuck!!

I finally just started scooping them out with a spoon and dumping them into a bowl when I got a great idea.

I continued putting them all in the bowl and when I was finished I smashed them down until they were packed nice and tight. Then I let them sit for a couple of hours, turned the bowl upside down and popped out this perfect bomb!!

A little sprinkle of powdered sugar, a sliced strawberry and we have a very rich dessert that nobody new I had messed up (until I told them my story of course!).

Wednesday, February 25, 2009

More digital scrapbooking


Here's my latest!! I'm very happy with the way this turned out.

I did the whole thing in Paint.Net. This is an excellent program for the weekend digi-scrapper (and it's free!!).

I go the "paper, ribbon, and butterflies" for free simply by searching the web. Just type "free digital scrapbooking" in your web-browser and you'll get tons of hit.

Everything is it's own layer. That is, the paper is the background layer, the picture is layer 2, the ribbon is layer 3 and so on. This makes it super easy to manipulate the page later on if something isn't quite working the way I wanted it to.

The butterflies are on two distinct layers. For the bottom layer, I placed the butterflies in the corners, went to "Layers", "layer properties" and set the opacity to 111. In the next layer, I offset the butterflies and left them the way they came. This gives the nice shadowy image I was hoping for.

The font is called Scriptina. You can download it here.

If you click on the photo you'll get a bigger version of it and you can see that I modified the picture to look like an oil painting. On the layer that holds the picture, I selected the picture. Next I went to "effects, then Artistic, then Oil Painting". I set the brush size to 3 and the coarseness to 50.

Monday, February 23, 2009

Virtual Stamp Night

I liked this one the best out of all that I did. We had to make a card that a man would give to a woman...no ribbon, no prima flowers but you did have to use three brads, stamps had to be nature (not animals either) and you could only use vanilla, kraft, and navy cardstock!!

I didn't have kraft so I used creamy caramel. I used the botanicals and set sail sets.

Virtual Stamp Night

In this challenge, we had to use acetate or window sheets in our card. I had bought this acetate (which had a frame attached to it) about 6 months ago and never got around to using it.

It sure made a quick card. It's attached to the card with brads and then I cut around the edges (the green is not part of the card). I layered the cardstock in colors that would match the colors in the acetate.

Virtual Stamp Night


This is one of the cards I made that I really love. All we had to do was use a new stamp. I'm so glad that I hadn't gotten around to mounting this set (dream a little) yet. Even though I only used the hummingbird I can tell that it's going to be a fun set to use.

I used the thumping technique to color the hummingbird, stamped him, "huffed" on him and then stamped again. It worked great to get the shadow effect.

Virtual Stamp Night

This challenge was to make a monochromatics card.

You could use any color and use any variation on that color. My son happened to walk in right when I was getting started and he decided that I had to use Green Galore (which is NOT my favorite color).

I was so happy I still had this stamp set (pocket friends)!! The frog is great to work with and I love adding the googly eyes.

I sponged the edges with Wild Wasabi and used the tag punch to punch the phrase. The striped grosgrain is wild wasabi which Stampin Up doesn't carry any more but they do have old olive which is kind of close.

Sunday, February 22, 2009

Virtual Stamp Night

This was the second challenge of the event but the first one that I participated in.

We were given a choice of 3 different color palettes to choose from, "white", "milk", and "dark" chocolate. I choose dark chocolate.

This is a very simple card (aren't they always the best!). I used white craft ink to stamp the image on the chocolate chip paper. My fibers are simply embroidery thread.

Saturday, February 21, 2009

Virtual Stamp Night


I have been participating in my very first Virtual Stamp Night at Splitcoaststampers. I have been having a lot fun. I am amazed that I have been able to come up with card ideas as quickly as I have. I will be posting the cards I've been making in no particular order.

For this card, the idea was to take a line from the movie The Princess Bride and make a card from that. I took the phrase "I am the dread pirate Roberts!" and thought what little boy doesn't dream of striking fear into the heart of his enemy with just his name!!

Thursday, February 12, 2009

Valentines Day!!

I love Valentine's Day. It's right up there with Christmas as far as I'm concerned!! We have a tradition of having big heart shaped sugar cookies decorated with frosting for breakfast, everyone gets cards, the kids get presents and we have a special dinner (this year it's cheese fondue). Here are some of the things I've made for this year's celebration. I've included a link for the "hidden message" cards and glasses. You can download them at Marthastewart.com. These are so awesome and as long as you have a color printer couldn't be any easier!!

Have a great Valentines Day!!