Thursday, December 27, 2007

Milk Carton Box


I hope that everyone had a great Christmas. It's now time to move on to the next holiday...Valentine's Day!! One of my favorte holidays!

Here is a fun box that you can make. You can make these feminine or masculine, depending on the paper and embellishments that you use. The pattern can be adjusted to any size that your printer can print.

You can also use this pattern for birthdays and other special occasions!!

Download the pattern here.

Tuesday, December 18, 2007

Pyramid Box Pattern

Here is the pattern for my pyramid box that I had on my blog awhile ago. You can enlarge this and print any size your printer will handle. If this doesn't work for you please email me and I will send you a pdf file.

The words on the flap say to fold outside edges to close box. What I meant to say was to fold the flaps, not the outside edges.

It's actually a very simple box. You cut the outside edges and fold everything else.!!

Friday, December 14, 2007

Stollen

Here is one of my newest past-times. Sometimes I cook or bake something that turns out so great I even amaze myself!! I decided I needed to keep a record of those items and what better way than to scrapbook them!!

This is a loaf of Stollen that I made as a test a couple of days ago. I found the recipe on the internet and then changed it to suit me. The original called for candied fruit which I don't like so I changed that to dried fruit. It also called for a glaze, I like the powdered sugar better.

I like this bread. It's dense but not too much so and it doesn't crumb all over the place.

Our Christmas Tree

Here is a picture of our "upstairs" tree. This is the one I decorate. The kids tree is downstairs. This year I only used white lights and the old shiny ornaments my husband's grandma gave to me. I also put glass icicles on it.

The santa hanging on the wall is a small rug that my sister bought me while she was teaching in Turkey.

Tuesday, December 11, 2007

Coffee Filters and Sunsets

With Christmas break coming up this is definitely one to file away for those days when your kids have nothing to do or (for those of you who are lucky enough) for the snow bound days!

Here's what a 4-year old boy can do with watercolors and a coffee filter. My son was very bored one day (years ago) so we got out some watercolors and coffee filters and let him paint, paint, paint. It seemed to work best when we'd wet the coffee filter before he painted, the colors just seemed to flow better. I used about half of what he did as backgrounds for one thing or another.

You could also punch flowers out , they make great looking bouquets because no two are alike.

For those who are interested. The scenery came from Stampin' Up! sets (the hills I just drew in). The little girl is a "front and Back" set called "Lisa" from Art Impressions. Obviously this is the "back".

Sunday, December 9, 2007

Christmas Table Decorations

Here's what I've been working on!! I have one of these to go at each place setting for our Christmas Dinner table.

The box was cut using the Silhouette Die Cutter (my friend has one and it is one my wish list!). The tree is from Stampin' Up! (I think the set is called Season of Joy).

I Stamped two trees for each box. After cutting out the trees, I turned them over and stamped the other side. Then I placed both trees together and cut off the rounded bottom so I would have a flat surface to glue. Next I cut one tree about 1/2 up from the bottom and another a little less than 1/2 down from the top.

Then it's just a matter of sliding the two together. Gluing isn't necessary as they stick together pretty well.

I also stamped a poinsettia flower from the same set for each box. Then I smeared ( a really good coating but not thick) glue on the flower and stuck the tree into the glue. After that was dry I glued the whole thing onto my decorated box, put a little candy in each one and was finished.

This was a little time consuming by not really difficult.


Wednesday, November 28, 2007

Morning Visitor

Here's what flew into our neighborhood this morning. I think this is a blue heron. It's so much bigger than it looks here!! It was foggy this morning so the picture didn't turn out that great, also, it's in our neighbors yard so it was also far away.

It's "stalking" the fish in my neighbors pond (wonder if there are any left!!). I had a great time watching him slowly move around and in and out of the water!

Living in the city we don't get sights like this very often unless we go to the wildlife refuge.

Sunday, November 25, 2007

Advent Calendar

This is probably one of the best advent calendars I've seen. My step mom made each of my kids one of these. Each year she buys all the goodies to go in them and I put it together. Even though my son is 13 he still loves opening one of these boxes each day.

Each box is 4X4 and you will need 25 for each calendar. Only the lid is stamped. The backing is a piece of foam core board (20X30) painted black and then Christmas-y type paper used as the background on top. Each of the squares has a letter in it that spells Merry Christmas and then the name of the child.

The boxes were the hardest to attach (and make them stay that way!). I know this because my step mom used hot glue which had come off by the time we got these home. I wanted something strong enough to hold them so we could hang these on the wall.

For my daughters, I punched a hole through the box bottom and foam core and put a brad through to hold the boxes. For my sons I used Gorilla Glue and that seems to be holding well.

On each box I punch hold in the bottom on opposing sides. After I put the goody in, I ran ribbon through the holes, placed the top on and tied the ribbon to hold the box lid on nice and tight and keep prying eyes out!!

Wednesday, November 21, 2007

Finally!

Well, I finally got rid of the smell. I don't know what it was but I had to resort to shampooing the carpets so maybe my dog is to blame although I didn't actually see anything.

So, now I am trying to get back into the groove of things. I have seen a couple of things that others have done with their punches and tried those.

I keep thinking....why didn't I think of that? I just need to get inspired!! Maybe I need to put my stamping stuff away and get my Christmas gifts made.

My kids have always played sports and they usually get a t-shirt with the sport organizations logo on it as their uniform. I have always saved these and decided this year I would make them t-shirt quilts for Christmas. I figure if I start now I might have them done by next Christmas!!

Happy Thanksgiving everyone.......

Monday, November 12, 2007

P-ewe!!!

Sorry I have been so quite here lately. My craft room has picked up a strange odor and I have been moving and cleaning and trying to find it (unfortunately it smells like a dead animal!!).

My room isn't that big but it sure seems like there are a lot of hiding places!!!

Wednesday, November 7, 2007

Yet Another Christmas Card!

Well, I just can't stop!! Here's a card I totally CASE'd from someone. I wish I could remember who it was because this is a definate WOW! card!! I made about 8 that looked like this and about 8 more that did not have the 3 flowers off to the side but instead have "merry" stamped sideways in that spot.

The 3 little ornaments on the tree are little red fuzzy pom-pom's. I'm not sure that these will hold up through the mail so I'll probably hand deliver these.

Tuesday, November 6, 2007

Christmas Card

I love this card. It was easy since there is no coloring. I used confetti white cardstock and the ribbon actually comes through a hole in the accent piece. That is the new taffeta ribbon. Wonderful stuff!

Sunday, November 4, 2007

Snowman Christmas Card

Yet another Christmas card!! I loved this one. The only thing stamped here is the Merry Christmas. I saw this snowman paper at our local scrapbooking store yesterday and just had to get it. The snowman print is on one side and the stripes are on the other.

I used SU's ticket punch to make the "merry" ticket and the tab punch to make the "Christmas" bit. I'm still not great at sewing cards but I'm getting there!

Wednesday, October 31, 2007

Glass Etching


This is a candle tray that I made. I was actually trying for a darker etch but was worried that something was going wrong and stopped the process too early. The little yellow flecks are actually on our desk, not on the tray.

You'll need some kind of glass, flat works best for stamping. Armor etch, latex gloves, clear embossing powder, heat tool.

Wash and dry your glass (since I used a tray that's what I'll call it from now on). If you are going to be using your tray for serving food, you want to etch the other side, not the food side.

Pick what design you want. Something with lots of details or fine lines doesn't work very well. You want something a little solid.

Emboss just as you would for paper. If you accidentally slip, just wash it off and start over. Then emboss. This took me a bit longer that I thought it would. I guess the glass had to heat up too.

After you have it embossed, get your gloves on and your armor etch. After that you will need to follow whatever directions are on your etching compound. When the etching is complete, just wash it off and then scrape off the embossing powder to leave a clear image.

When it's done and dry you have a one of a kind gift to give or keep! I'm making a couple with a Christmas design, fill the plate with cookies and give it to our schools secretaries.

Monday, October 29, 2007

pyramid box

One of my co-workers had this little pyramid on her desk showing the food chain or something like that. I saw it and thought, wow, what a cool box!

So here is my first cut. The top is actually supposed to tuck inside but it was easier to secure it with loopy brads. I also used organza ribbon as a hanger but next time I would make both the hanger and the fastener the same.

I have visions of 10 or so of these on my Christmas tree this year!

Friday, October 26, 2007

Goodie Boxes

We are having a group of friends over on Saturday to carve pumpkins.

I made these little goodie bags for all of the kids who will be there.

It was easy but time consuming because there are so many (in fact, I think I still need two more!).

I used Beate's one sheet box as a template and just went from there. Here's what the first one looked like. If you look close you can see that they got a lot more basic after this one!!

Thursday, October 25, 2007

Another Mini Scrapbook

This was a quick little scrapbook I made to highlight our trip up to mount hood.

It was so easy!! The hardest part was getting the pictures the right size to fit. You can make this any size depending on your pictures.

Figure out the size of the pictures you want to place in it, double that (because you will have a picture on the top and bottom). Add 1/4" to 1/2" to measurements and this will be your inside pages to mount the pictures on.

The add another 1/2" to 1" to those measurements and that will be your cover.

You can embellish the cover anyway you want. Punch a couple of holes to run your ribbon through. The ribbon goes behind the pictures so make sure the pictures are put in last.

After you make your "pages", they are simply stapled to the cover

This would be a fun gift for grandparents.


Wednesday, October 24, 2007

Teacher Gifts


Here's a gift I made for one of the teachers I worked for last year. This is another easy project and very cost effective. The journal came from the dollar store and the pen was probably another 1.00.

It's a great use for the older Stampin' Up! Designer paper that was only printed on one side.

The "K" is sponged around all the edges and I used grograin ribbon along the edges.

The flowers are from "Got Flowers?". I put a daub of crystal effects in the center of each one and put some little clear beads.

The pen has the same paper inside as the cover of the journal.

Tuesday, October 23, 2007

Gift Box


Here's what I made last night. I love giving gift cards as gifts. I'm finding though, that the trick is to package them in a fantastic way.

I came up with this little box last night. It's 2 1/2 inches X 3 1/2 inches with 1/2 inch in height. It could be thinner.

The flaps on the ends just fold in. This one is for a Starbucks cards (duh!)

I'll upload the template this weekend. You could resize this box to hold just about anything!

Saturday, October 20, 2007

Never Ending Tag Card

This is an easy, but impressive card to make. The base of the card is pink.

I mounted the patterned paper onto the brown cardstock. After cutting out the mini envelope, I mounted it onto the patterned paper and then cut a slit in the bottom of the envelope all the way through the cardstock. This way, when you put the tag in it will slide all the way down.

Then I just folded the envelope and made a tag that was about 5 inches long to put in the envelope.


Soccer Scrapbook Pages


Whew! I'm only 1 year behind on my scrapbooking!

Here are the pages I did for my kids 2006 soccer season.

I always try to get as many pictures on one page as I can so the Stampin Up! tag punch really came in handy here!

There's no stamping on these pages. I have a really great dragonfly stamp but when I was at the scrapbooking store I found these wonderful pastel colored and glittered dragonflies (that was her team name) for my daughters page.

I also like the way I placed the row of tags along the bottom.

Friday, October 19, 2007

Mini Scrapbook

Here's a quick and easy mini scrapbook that also makes a great gift for grandma.

You can make these as big or little as you want simply by adjusting the measurements.

The end product of this one is 4X4. I started with an 81/2 X 11 sheet of paper and cut it down to 8X8. I used an envelope flap for a template to make the closure.

Since I had so few pictures in this one I didn't have to worry about it not closing but you could add an extra fold along each edge so you could put more accordian folds in it.

You are going to want to decorate the front before mounting your picture in though, especially if you're planning on used brads, eyelets, or anything like that.

This is simply tied shut with gold cord but you could get as fancy as you'd like.

I have pictures on both sides of the accordian fold.

You can make these using a theme (all halloween or all christmas, whatever). They're quick and they mail nicely!

Thursday, October 18, 2007

Shaving Cream

If you've never done the shaving cream technique you have go to try it. It's messy but I love the results.

It works best with non-glossy cardstock. Take regular shaving cream (not gel), the dollar stores usually carry it. Spray some cream into a flat pan.

Take a couple of different colors of reinkers. Here I used blue and green for water. You could use orange and purple for halloween, pumpkin and brown for thanksgiving, etc.

Dot the reinkers over the cream and, with a toothpick, or skewer, or a pencil, swirl the ink through the cream until you like the way it looks.

Carefully lay your cardstock into the cream, lift off and wipe with paper towels.

You get the most amazing background paper!!

Tuesday, October 16, 2007

eek!


I saw a card similar to this one in a magazine. I used one of the tag stamps from Stampin' Up! and used a black marker to color the stamp.

The spider webs and drag lines were drawn by hand.

I used Everyday Flexible Phrases for the "happy halloween".

You can't really tell from the picture but along the right side and half way across the bottom I used my piercing tool to punch little holes.

I used traditional orange and black but a deep purple and orange would look great too!!

Monday, October 15, 2007

Ornaments


This is a fun project that is very quick and easy.

I couldn't get a very good picture but they really look great in person!

I hope I explain this well enough. If you need more instructions just email me.

You will need the following items.


Printed paper or paper that you have stamped on. Cardstock is a little bit too thick. If you want to use cardstock then skip all the steps dealing with the thin chipboard.

Thin chipboard, such as the chipboard that Stampin' Up! puts in their designer paper as a stiffener.
Small hole punch and a large circle punch

Linen thread or some other means of making a "hanger"
Glue gun, Sticker maker or glue stick

First you will need to cut your paper so that it will go through your sticker maker. If you are going to glue your paper to the chipboard then it won't matter what size it is.

Put your paper through the sticker maker and mount it onto the chipboard.

Do the same with another piece of paper, either the same pattern, a contrasting or a complimentary pattern.


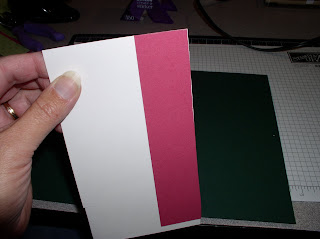
Mount the second piece by turning the chipboard over and mount it on the opposite side of the chipboard.

If you are using cardstock just stick the two pieces of cardstock together.


Punch out or cut 4 circles. The bigger your circles, the bigger your ornament.


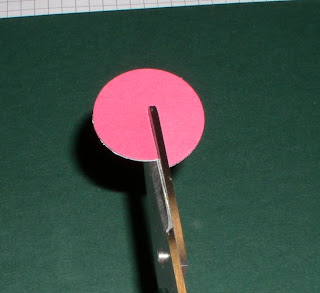
When you have four circles you will need to cut slits in two of them. Only cut half way through each.


Then, make the same cut again, very close so that you end up with a "slot" that is tight.

Punch a hold in one of the circles with a slit punch. This is where you will put your linen thread for hanging.


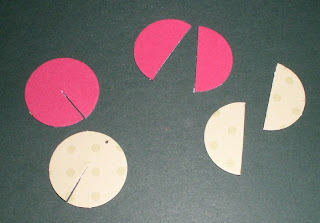
Cut the remaining two circles completely in half.


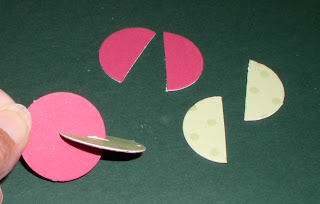
Slide the two circles that are cut half-way through together.


With your glue gun, pipe a thin bead of glue along the inside edge of one of the wedges. Quickly stick one of the "halves" into place.

Continue with the remaining three half-circles until you go all the way around the ornament.


Now you have a cute ornament to hang. Use different types of paper for different holidays!!


The flash made the glue really show up but it doesn't show up that much in real life.

Friday, October 12, 2007

Snowflake Card


This card was so easy to make. It's hard to see but the brad has a crystal center that really shines.

I love the see through snowflake. I wish I would have bought more of them!

I also think this would have looked better with some stitching but I hadn't got more sewing machine out yet when I made it.

Thursday, October 11, 2007

Holiday Party Mix


This is a great gift for neighbors. You can make a big batch, it looks great in the gift jar and is delicious!!

Ingredients

1-1/2 cups powdered sugar
1/2 tsp. ground nutmeg
8 cups corn or rice square cereal
1 cup white baking pieces
1/2 cup smooth peanut butter
1/4 cup butter
1/4 tsp. vanilla
1-1/2 cups cashews
1-1/3 cups dried cranberries

Directions

1. In a large zip loc bag combine powdered sugar and nutmeg; set aside. Place cereal in a very large bowl; set aside.

2. In a medium saucepan combine white baking pieces, peanute butter, and butter. Stir over low heat until melted and smooth. Remove from heat. Stir in vanilla.

3. Pour butter mixture over cereal mixture; carefully stir until cereal is evenly coated. Cool slightly. Add cereal mixture, half at a time, to powdered sugar mixture in bag and shake to coat. Add nuts and fruit. Shake until combined. Pour into shallow baking pan lined with waxed paper to cool. Store in an airtight container up to 2 days. Makes about 14 cups.

Kids Version: Prepare as above, except substitute 1/4 cup unsweetened cocoa powder for the nutmeg; peanuts for the cashews; and dried raisins for the dried cranberries. You can even throw in some M&M's or Recees Pieces.

Wednesday, October 10, 2007

Black and White Card


This is a simple card I made one day when I was trying to be very elegant!!

The black is mounted on a quarter sheet of white.

I used white craft ink and white organza ribbon.

Monday, October 8, 2007

Scallop Punch


I've been playing around with my scallop punch. I really like it so far.

It's hard to tell but this card uses Green Galore, Summer Sun, and Elegant Eggplant. The colors look great together.

I used gold cord and wrapped it around the punch to give it more definition. The punch is mounted on the card with Stampin' Dimensionals to make it stand out even more.

Friday, October 5, 2007

Fantasy Box


This is one of those projects that is fairly simple but gets rave reviews!! The main thing here is to take it easy and go step by step. You can get all of the instructions at the website listed below. You can do just about anything you can think of to close the box, I used a little turny thing here but I've also used ribbon and velcro.


I was very surprised how easy it was to place the "shelves" so the box would close. My only suggestion would be that when you are initially laying the box out, after you placed your stamped or printed paper over the chipboard or heavy cardboard, fold the box before the glue dries and let it dry folded. I tore my first box because I let it dry flat and then tried to fold it.

Be sure to give this one a try!!

http://www.stubbystampers.com/whatsnew/projects/fantasybox.html